Getting Started
System Requirements
.NET SDK ver.8 or later
Example Scenario
For the example scenario, you already have a Blazor WebAssembly application project, "MyBlazorWasmApp1", that includes the "Button" component.
Blazing Story supports Blazor Server application projects as well as Blazor WebAssembly application projects.
📂 (working directory)
    + 📄 MyBlazorWasmApp1.sln
    + 📂 MyBlazorWasmApp1
        + 📄 MyBlazorWasmApp1.csproj
        + ...
        + 📂 Components
            + 📄 Button.razor
            + ...
Preparation
Close all Visual Studio IDE instances (if you use Visual Studio IDE), and install the "Blazing Story" project template with the following command. (This installation instruction is enough to execute once in your development environment.)
dotnet new install BlazingStory.ProjectTemplates
Creating A Blazing Story App And Stories
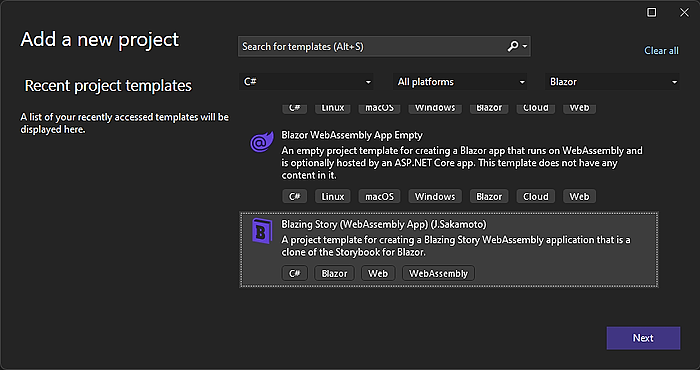
Step 1 - Create A New Blazing Story App Project
Open the solution file (.sln) with Visual Studio, and add a new "Blazing Story (WebAssembly App)" project from the project templates. (In this example scenario, we named it "MyBlazorWasmApp1.Stories")
If you are working on a Blazor Server application project, you should add a new "Blazing Story (Server App)" project instead of the "Blazing Story (WebAssembly App)" project.
To use the MCP server feature, you need to add a new "Blazing Story (Server App)" project and check the "Enable the MCP server feature" checkbox in the project creation dialog.
Note that the MCP server feature is not available in the Blazing Story app when running on Blazor WebAssembly.
If you are working on dotnet CLI, you can do that with the following commands in a terminal.
Please remind again that this example scenario assumes that there is already a solution file (.sln) in the current directory with an existing Blazor WebAssembly app project.
# Create a new Blazing Story app
dotnet new blazingstorywasm -n MyBlazorWasmApp1.Stories
# Add the Blazing Story app project to the solution
dotnet sln add ./MyBlazorWasmApp1.Stories/
If you are working on a Blazor Server application project, you should run the dotnet new blazingstoryserver command.
To use the MCP server feature, you need to run the dotnet new blazingstoryserver -mcp command.
Note that the MCP server feature is not available in the Blazing Story app when running on Blazor WebAssembly.
The file layout will be the following tree.
📂 (working directory)
    + 📄 MyBlazorWasmApp1.sln
    + 📂 MyBlazorWasmApp1
        + ...
    + 📂 MyBlazorWasmApp1.Stories
        + 📄 MyBlazorWasmApp1.Stories.csproj✨ 👈 Add this
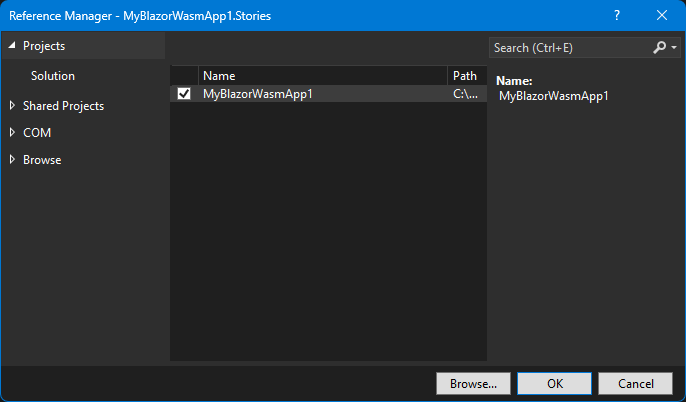
Step 2 - Add A Project Reference Of The Blazor Wasm App To The Blazing Story Project
Next, add a project reference in the Blazing Story App project "MyBlazorWasmApp1.Stories" that refers to the Blazor WebAssembly app project "MyBlazorWasmApp1".
If you are working on dotnet CLI, you can do that with the following commands in a terminal.
dotnet add ./MyBlazorWasmApp1.Stories reference ./MyBlazorWasmApp1
📂 (working directory)
    + 📄 MyBlazorWasmApp1.sln
    + 📂 MyBlazorWasmApp1 <--- refers --+
        + ...                           |
    + 📂 MyBlazorWasmApp1.Stories ------+
        + ...
Step 3 - Add A "stories" File
Add a new "stories" file to the Blazing Story App project "MyBlazorWasmApp1.Stories".
:::tip AI-Assisted Story Creation
You can also have an AI coding assistant scaffold stories for you. Install the Blazing Story agent skills and instruct your AI agent to create a .stories.razor file. See Agent Skills for details.
:::
A "stories" file is a normal Razor Component file (.razor), but it is annotated with the [Stories] attribute and includes a markup of the <Stories> component. There is no restriction on file layout of "stories" files, but usually, we place it in the "Stories" subfolder.
Currently, The file name of the "stories" files must end with ".stories.razor". This is a requirement of the naming convention for available the "Show code" feature in the "Docs" pages.
In this example scenario, we are going to write a "stories" for the Button component lived in the "MyBlazorWasmApp1" project, so we would add a new story file named "Button.stories.razor" in the "Stories" subfolder where is under the "MyBlazorWasmApp1.Stories" project.
📂 (working directory)
    + 📄 MyBlazorWasmApp1.sln
    + 📂 MyBlazorWasmApp1
        + ...
    + 📂 MyBlazorWasmApp1.Stories
        + 📄 MyBlazorWasmApp1.Stories.csproj
        + 📂 Stories
            + 📄 Button.stories.razor✨ 👈 Add this
Step 4 - Implement The "stories"
Implement a stories.
The "Button.stories.razor" would be like the below.
@using MyBlazorWasmApp1.Components
@attribute [Stories("Components/Button")]

<Stories TComponent="Button">

    <Story Name="Primary">
        <Template>
            <Button Label="Button" Primary="true" @attributes="context.Args" />
        </Template>
    </Story>

</Stories>
Step 5 - Run It!
If you are working on Visual Studio, right-click the "MyBlazorWasmApp1.Stories" project in the solution explorer to show the context menu, click the "Set as Startup Project" menu item, and hit the Ctrl + F5 key.
If you are working on dotnet CLI, you can do that with the following commands in a terminal.
dotnet run --project ./MyBlazorWasmApp1.Stories
Then you will see the clone of the "Storybook" built on Blazor! 🎉